Login
Login URL
Access to http://domain.com/wp-admin
Login Account
- Username: user
- Password: will be sent via email
Page Management
Home
Please, follow the steps below to manage Page
- Step 1 - Login to Wordpress Dashboard
- Step 2 - Navigate to Pages ► All pages
- Step 3 - Select General Home to Edit
- Step 4
- 1. Edit or delete image
- 2. Click Add row to add new item slider

- Step 4: Edit section Pickup/SUV and Truck
- 1. Edit Title
- 2. Edit content
- 3. Edit image and background

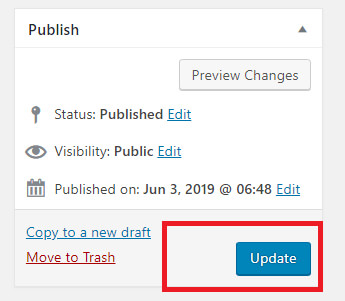
- 5. Click Update to save your work
Truck Home
Please, follow the steps below to manage Page
- Step 1 - Login to Wordpress Dashboard
- Step 2 - Navigate to Pages ► All pages
-
Step 3 - Select Truck Home to Edit
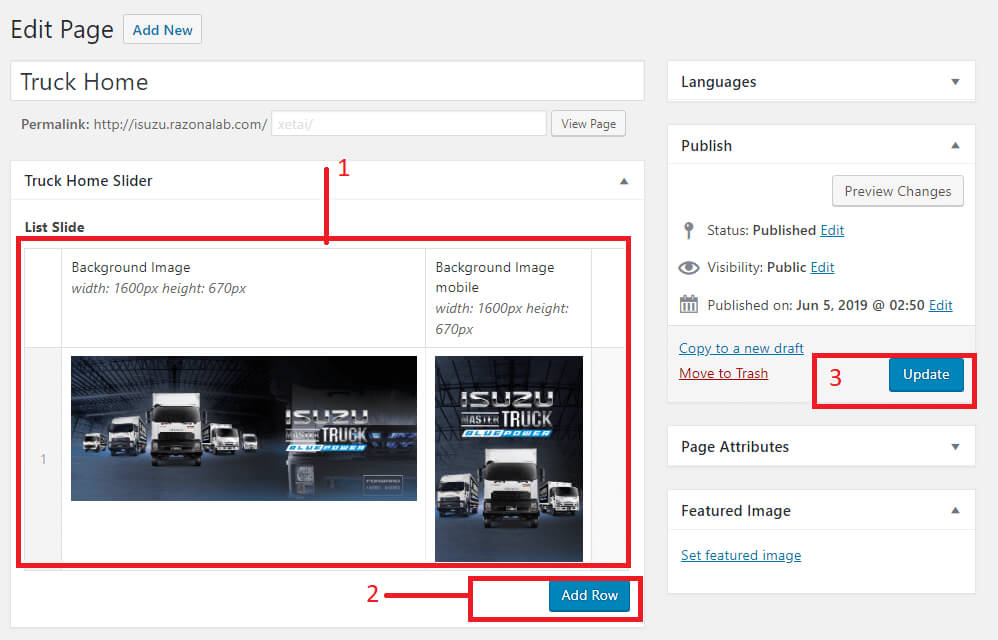
- 1. Edit or delete image
- 2. Click Add row to add new item slider
- 3. Click Update to save your work
Home Pickup/SUV
Please, follow the steps below to manage Page
- Step 1 - Login to Wordpress Dashboard
- Step 2 - Navigate to Pages ► All pages
-
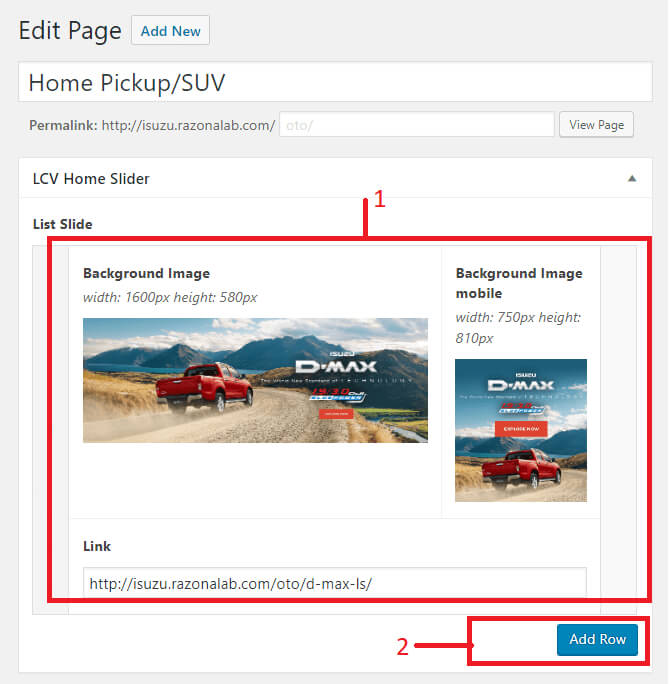
Step 3 - Select page Home Pickup /SUV to Edit
- 1. Edit image, url banner slider
- 2. Click Add row to add new item slider
-
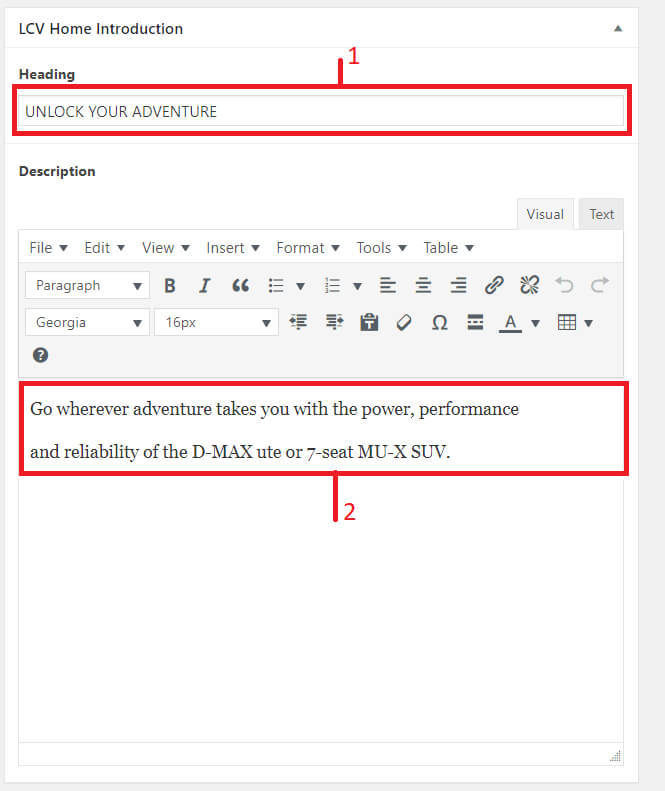
Step 3
- 1. Edit Introdution heading
- 2. Edit Introdution description
- 5. Click Update to save your work

News, Career, Dealers, Special Purpose Vehicle
Please, follow the steps below to manage Page
- Step 1 - Login to Wordpress Dashboard
- Step 2 - Navigate to Pages ► All pages
-
Step 3 - Select one page News, Career, Dealers, Special Purpose Vehicle to Edit
- 1. Edit title
- 2. Change banner PC and Mobile

- 5. Click Update to save your work

About us
Please, follow the steps below to manage Page
- Step 1 - Login to Wordpress Dashboard
- Step 2 - Navigate to Pages ► All pages
-
Step 3 - Select page About us to Edit
- 1. Edit title
- 2. Edit content
- 3. Change Message heading
- 4. Select mesage
- 5. Change image of content
- 6. Click Update to save your work

Contact
Please, follow the steps below to manage Page
- Step 1 - Login to Wordpress Dashboard
- Step 2 - Navigate to Pages ► All pages
-
Step 3 - Select page Contact to Edit
- 1. Edit title
- 2. Edit content

- 4. Click Update to save your work

LCV Accessories
Please, follow the steps below to manage Page
- Step 1 - Login to Wordpress Dashboard
- Step 2 - Navigate to Pages ► All pages
-
Step 3 - Select page D-max is child of Accessories to Edit
- 1. Add image
- 2. Change Caption
- 3. Change description
- 4. Add new item
- 5. Remove item

- Step 4. Click Update to save your work

LCV service
Please, follow the steps below to manage Page
- Step 1 - Login to Wordpress Dashboard
- Step 2 - Navigate to Pages ► All pages
-
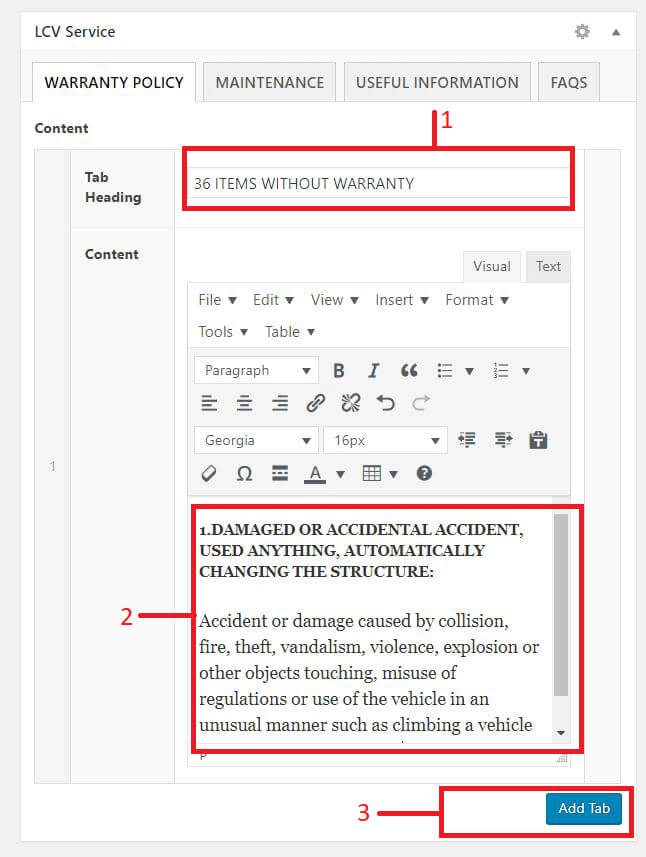
Step 3 - Select page LCV Service to Edit
- 1. Edit title tab
- 2. Change or edit content
- 3. Add new tab
- Step 4. Click Update to save your work

Truck service
Please, follow the steps below to manage Page
- Step 1 - Login to Wordpress Dashboard
- Step 2 - Navigate to Pages ► All pages
-
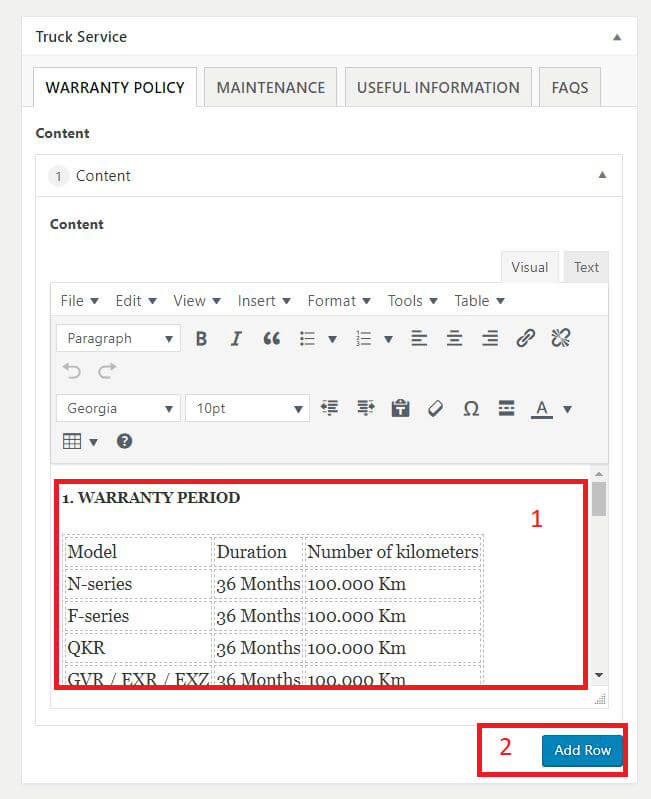
Step 3 - Select page Truck Service to Edit
- 1. Change or edit content
- 2. Add new section
- Step 4. Click Update to save your work

News Management
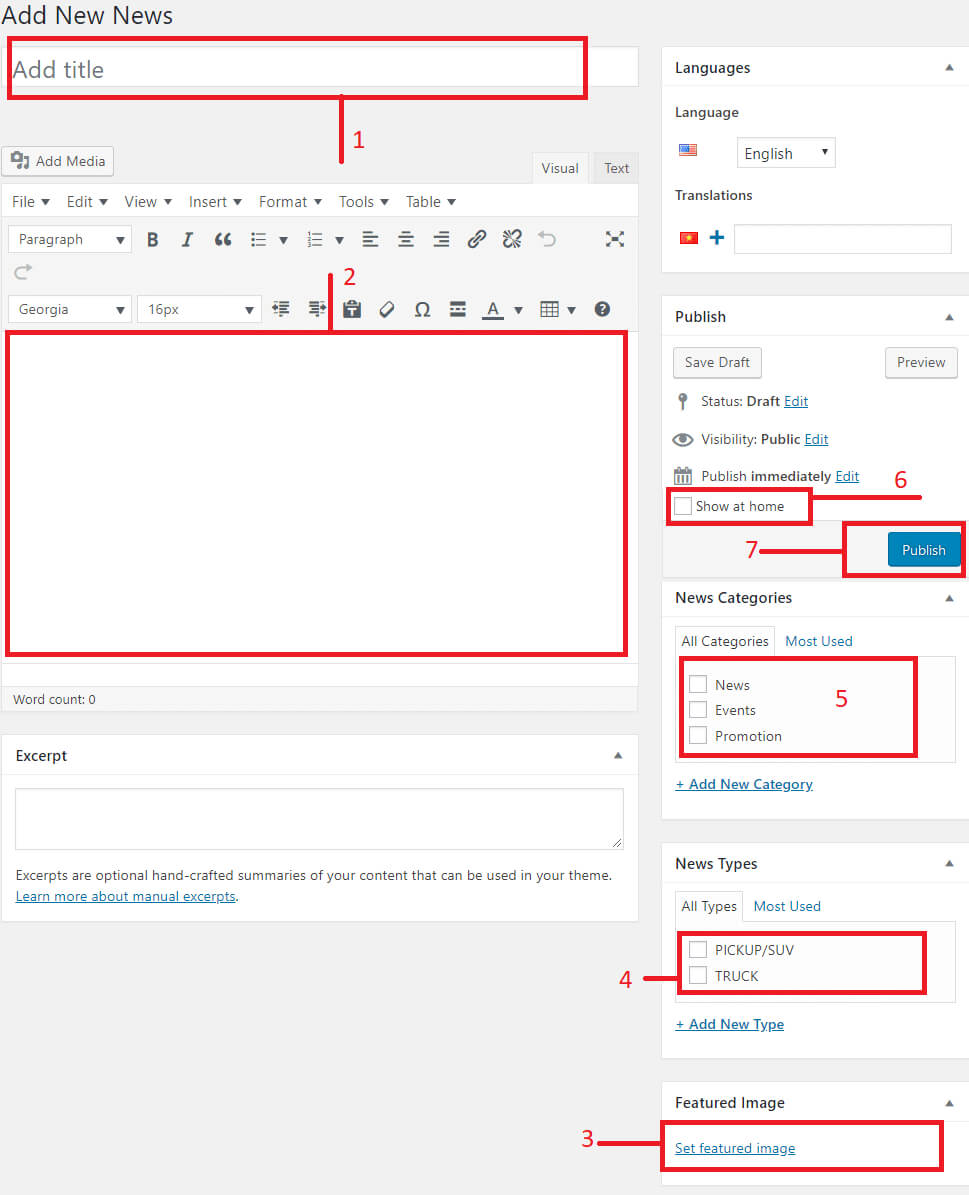
Add News
- Login to Wordpress Dashboard
- Navigate to Add News
- Step 1- Insert title
- Step 2- Insert content
- Step 3- Select or upload thumbnail of news
- Step 4- Select news type
- Step 5- Select news category
- Step 6- Select hot news show at home
- Step 7- Click Update to save
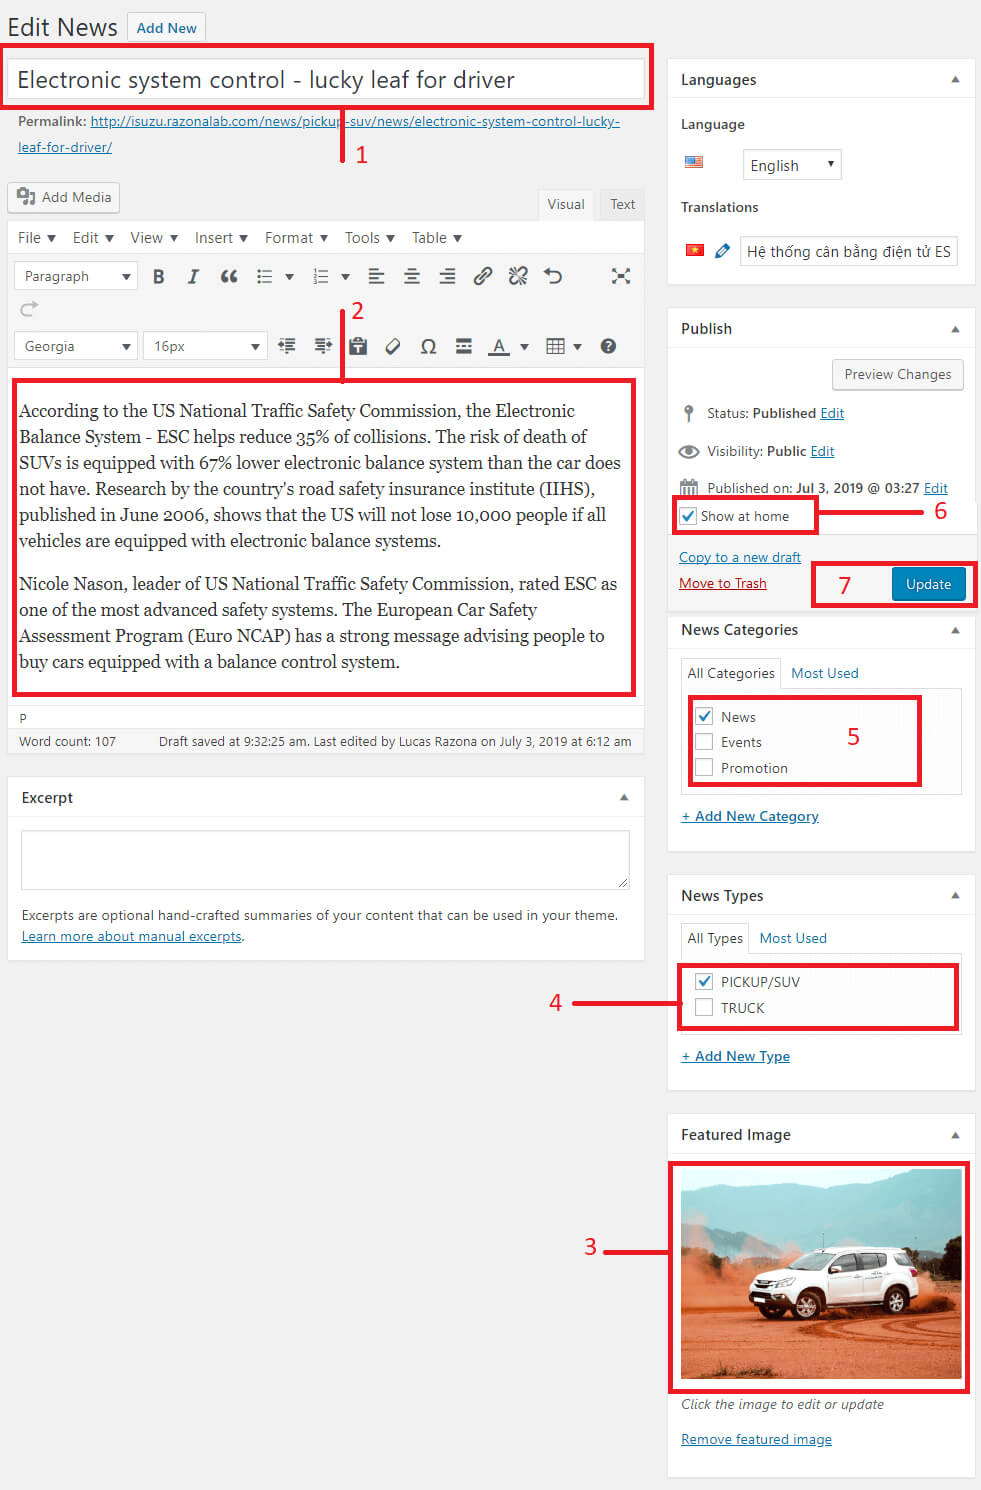
Edit News
- Login to Wordpress Dashboard
- Navigate to News
- Step 1- Change title
- Step 2- Change content
- Step 3- Select or upload thumbnail of news
- Step 4- Select news type
- Step 5- Select news category
- Step 6- Select hot news show at home
- Step 7- Click Update to save
Career Management
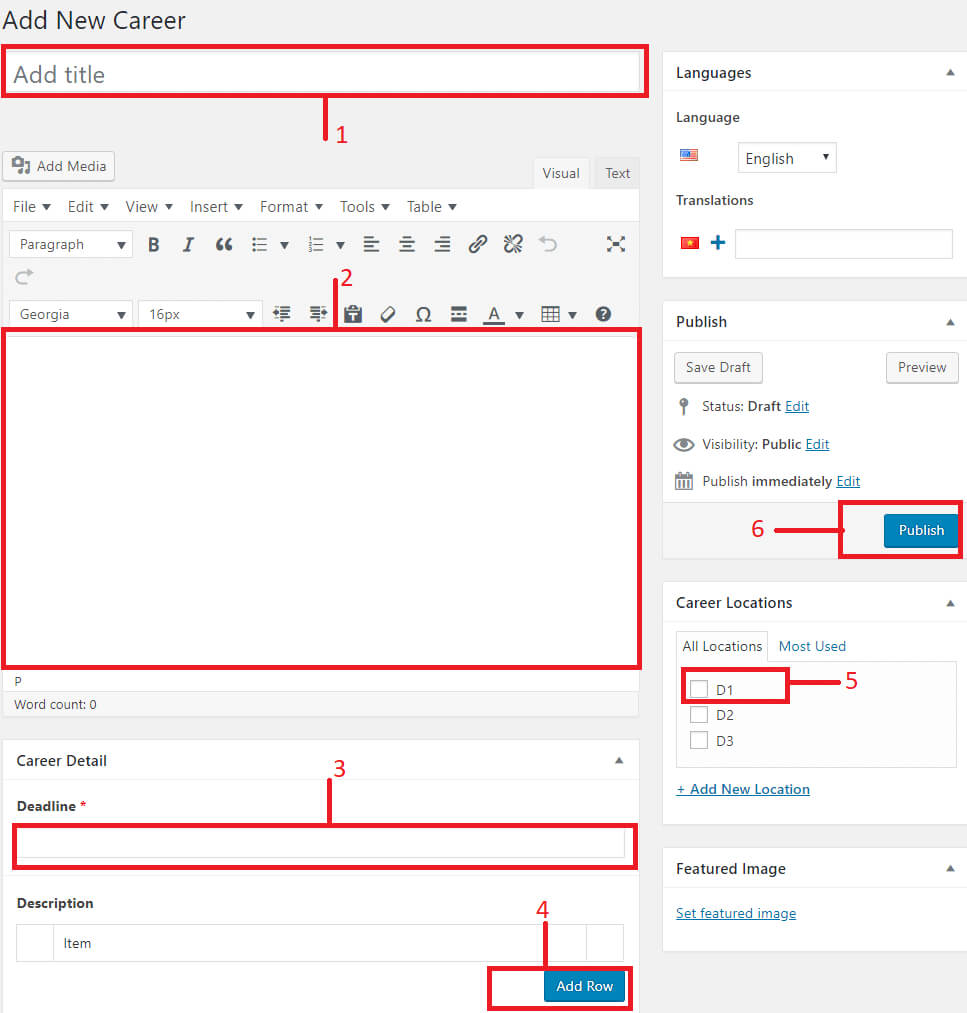
Add New Career
- Login to Wordpress Dashboard
- Navigate to Careers and select Add New
- Step 1- Insert title
- Step 2- Insert content
- Step 3- Insert deadline submit profile
- Step 4- Add new description career
- Step 5- Select Location of career
- Step 6- Click Update to save
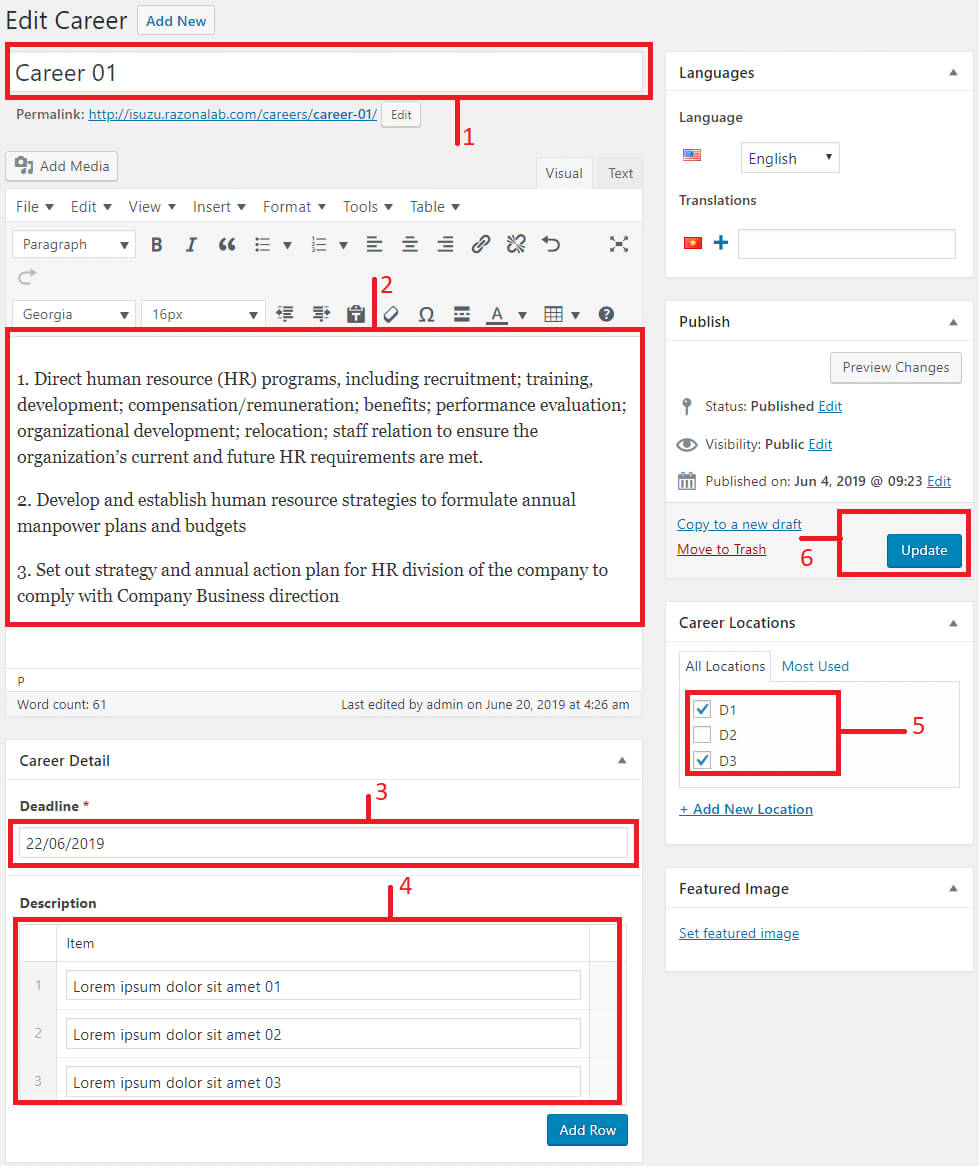
Edit Career
- Login to Wordpress Dashboard
- Navigate to Career -> All Career
- Step 1 - Select a title of career
- Step 1- Change title
- Step 2- Change content
- Step 3- Change deadline submit profile
- Step 4- Add new description job
- Step 5- Select Location of job
- Step 6- Click Update to save
Career Location
- Login to Wordpress Dashboard
- Navigate to Job -> List Location
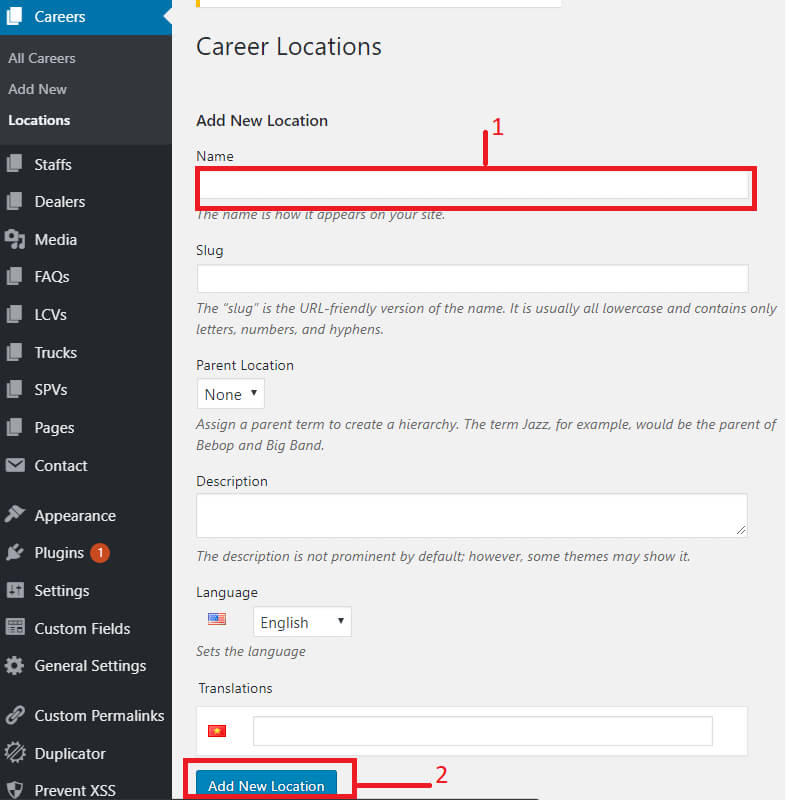
- Add new location
- Step 1 - Insert title of location
- Step 2 - Click Add new Location to save new location
- Edit location
- Hover to title of Location and click Quick Edit
- Step 1- Change title of career
- Step 2- Click Update Location to save
Starf Management
Add New Staff
- Login to Wordpress Dashboard
- Navigate to Careers and select Add New
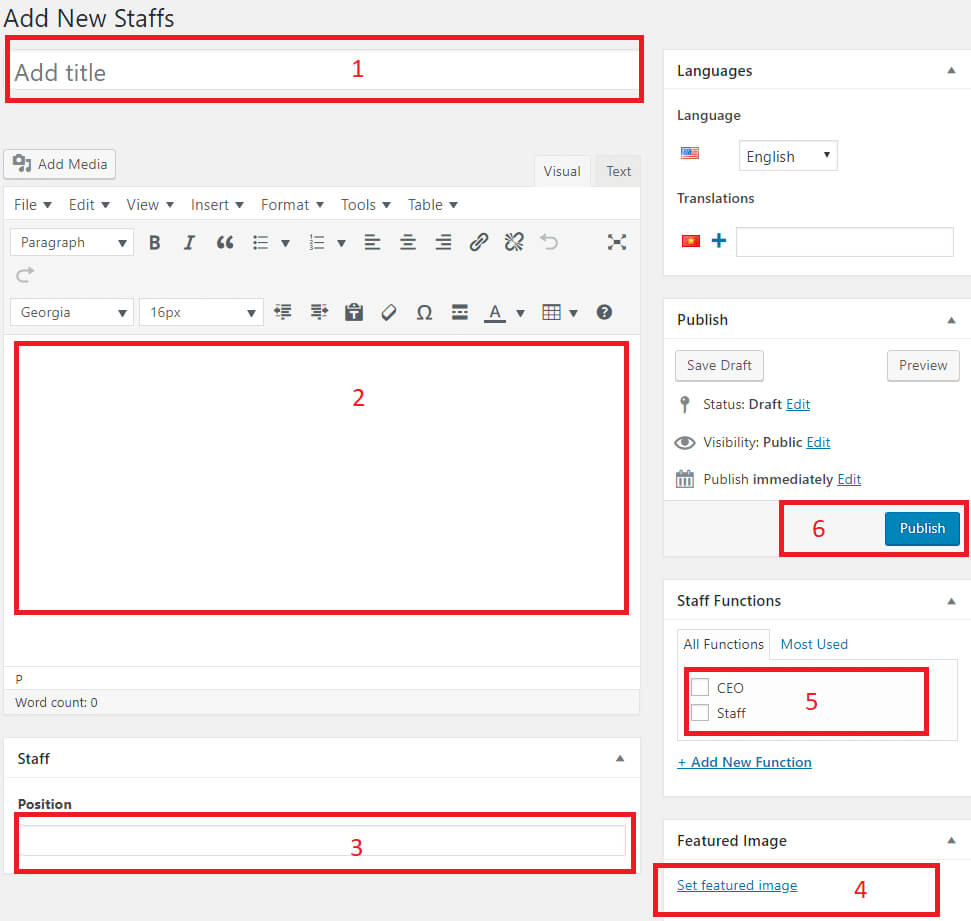
- Step 1- Insert title
- Step 2- Insert content
- Step 3- Insert position
- Step 4- Select or upload avatar
- Step 5- Select Staff function
- Step 6- Click Publish to save
Edit Career
- Login to Wordpress Dashboard
- Navigate to Career -> All Career
- Step 1 - Select a title of career
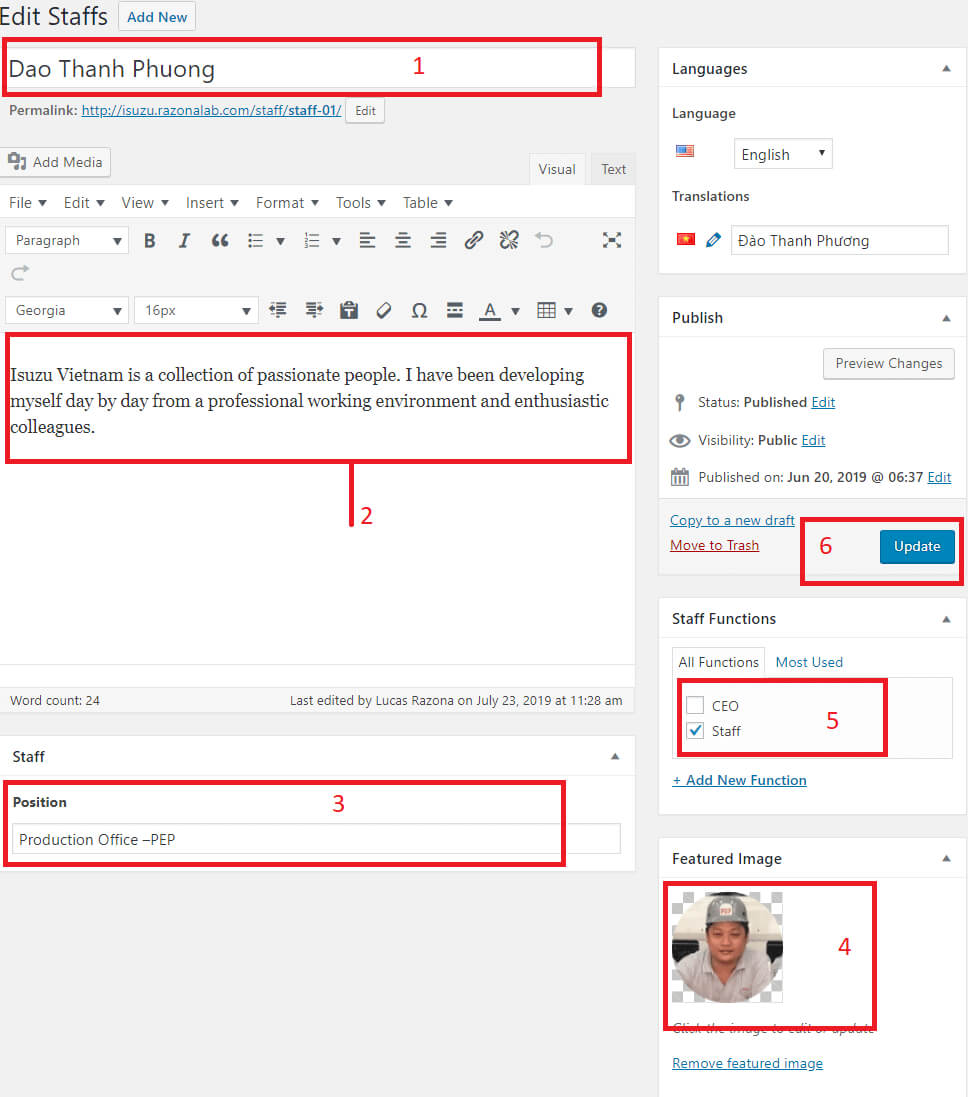
- Step 1- Change title
- Step 2- Change content
- Step 3- Change position
- Step 4- Select or upload avatar
- Step 5- Select Staff function
- Step 6- Click Update to save
Dealer Management
Add New dealer
- Login to Wordpress Dashboard
- Navigate to Dealers and select Add New
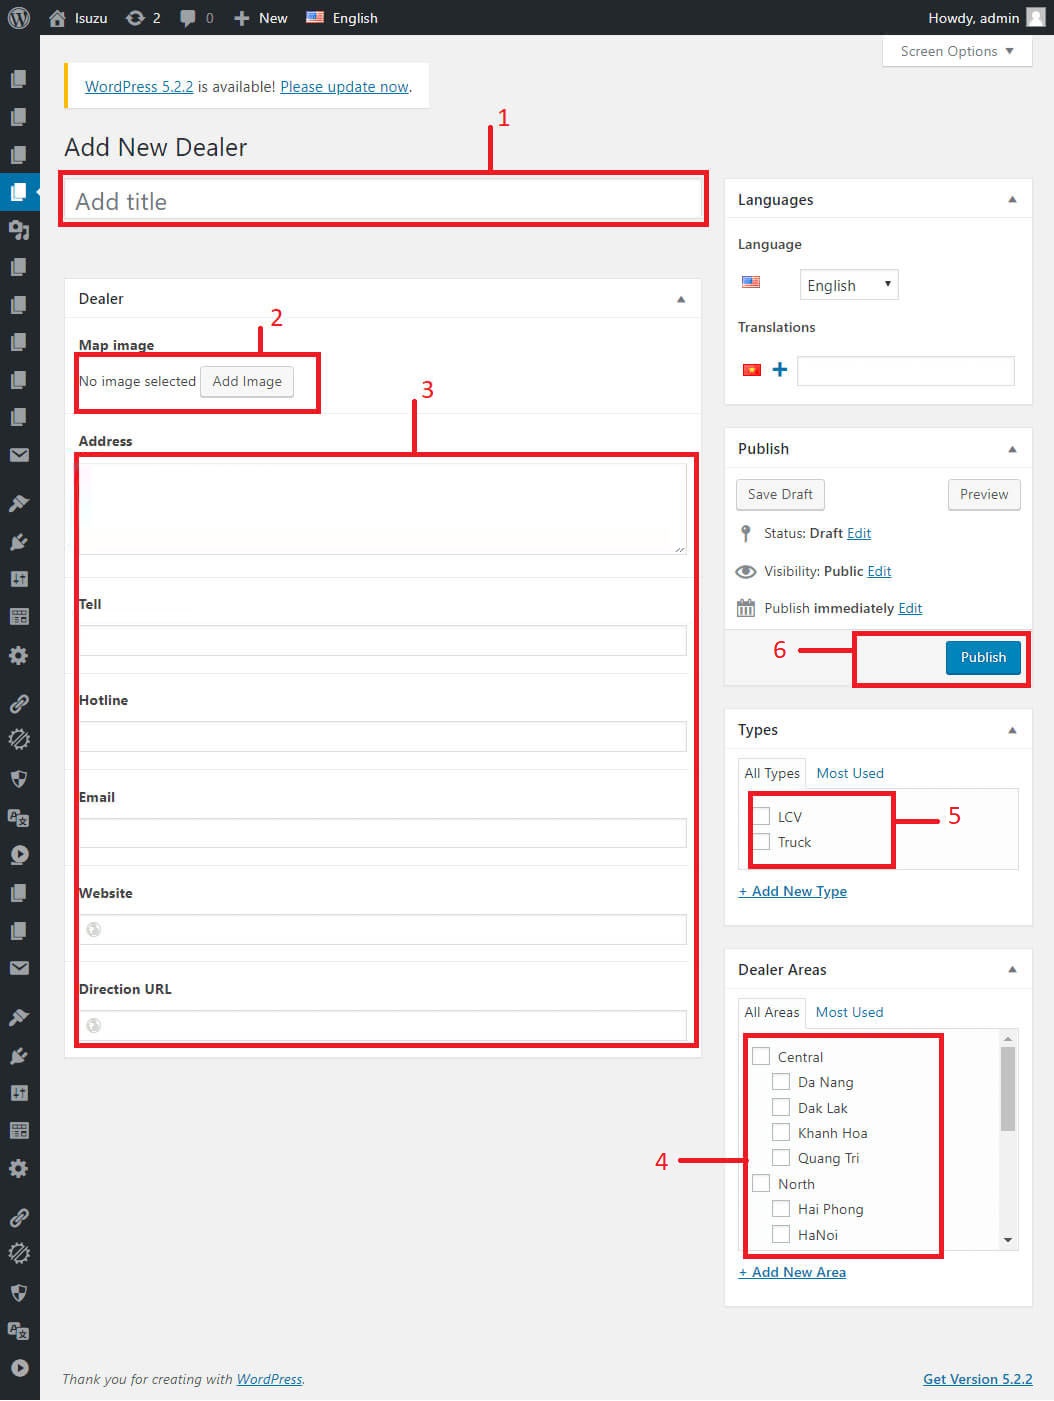
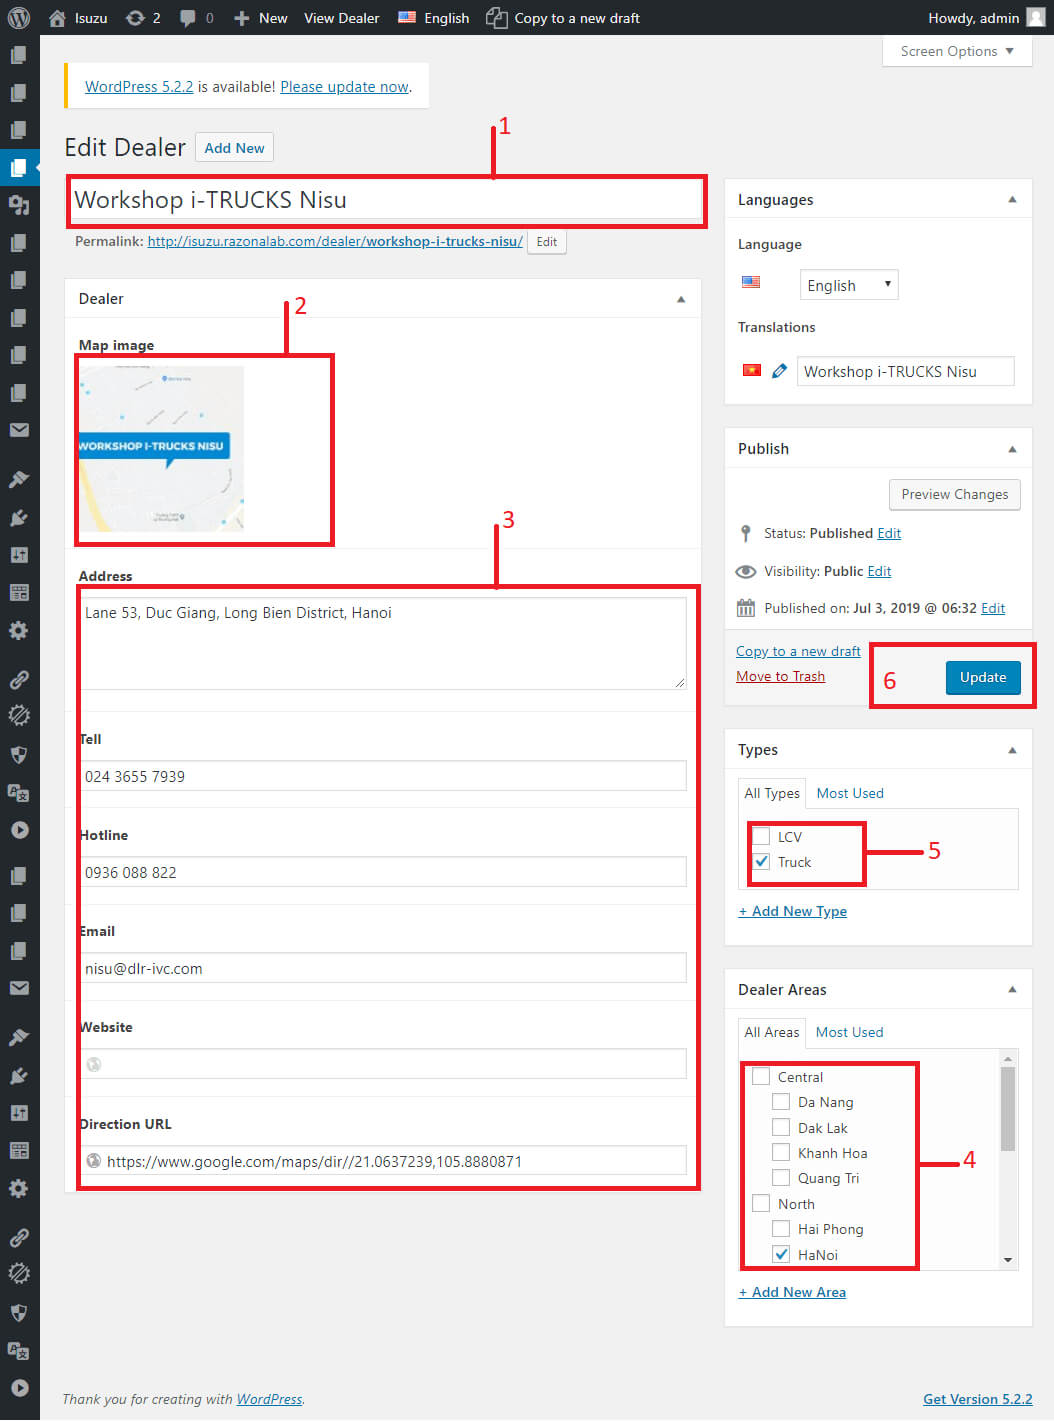
- Step 1- Insert title
- Step 2- Add image maps
- Step 3- Insert infomation of dealer
- Step 4- Select Location of dealer
- Step 5- Select type of dealer
- Step 6- Click Publish to save
Edit dealer
- Login to Wordpress Dashboard
- Navigate to dealer -> All dealer
- Step 1 - Select a title of dealer
- Step 1- Change title
- Step 2- Change image maps
- Step 3- Change infomation of dealer
- Step 4- Select Location of dealer
- Step 5- Select type of dealer
- Step 6- Click Update to save
Dealer Areas
- Login to Wordpress Dashboard
- Navigate to Dealer -> Dealer Areas
- Add new Areas
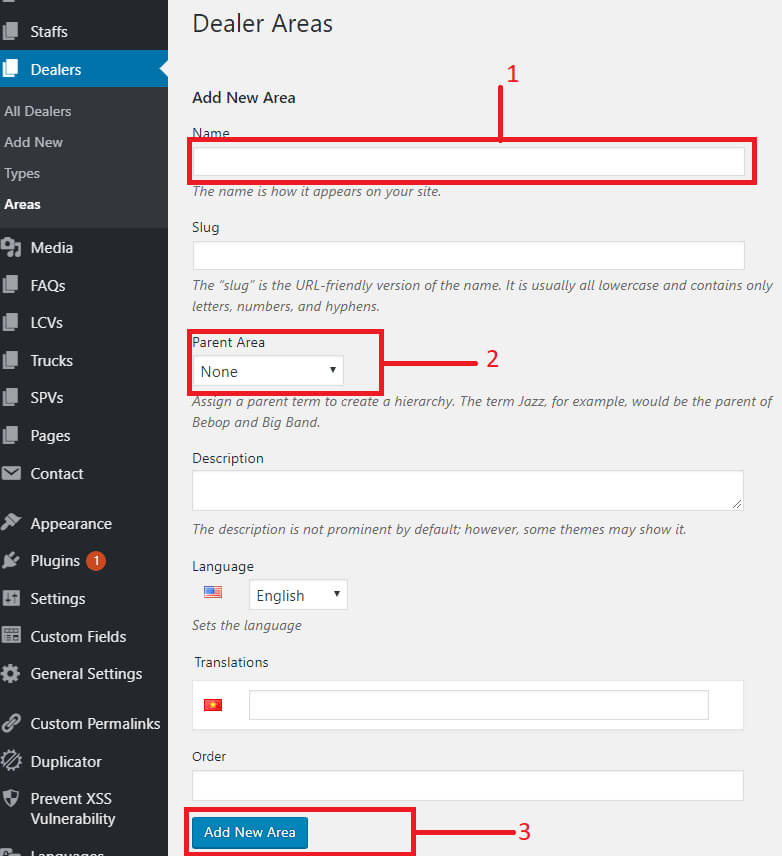
- Step 1 - Insert title of Area
- Step 2 - Select parent of Area
- Step 3 - Click Add new Location to save new Areas
- Edit Areas
- Hover to title of Area and click Quick Edit
- Step 1- Change title of Area
- Step 2- Click Update Area to save
FAQ Management
Add New FAQ
- Login to Wordpress Dashboard
- Navigate to FAQs and select Add New
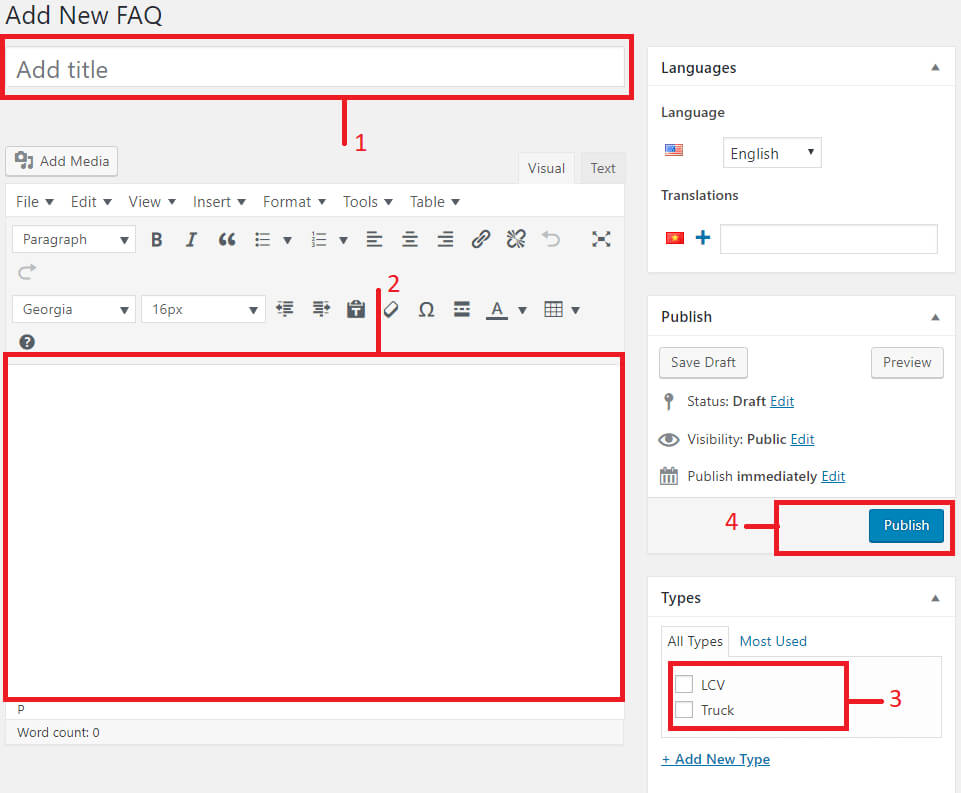
- Step 1- Insert title
- Step 2- Insert content
- Step 3- Select type of faq
- Step 4- Click Publish to save
Edit FAQ
- Login to Wordpress Dashboard
- Navigate to FAQ -> All FAQ
- Step 1 - Select a title of FAQ
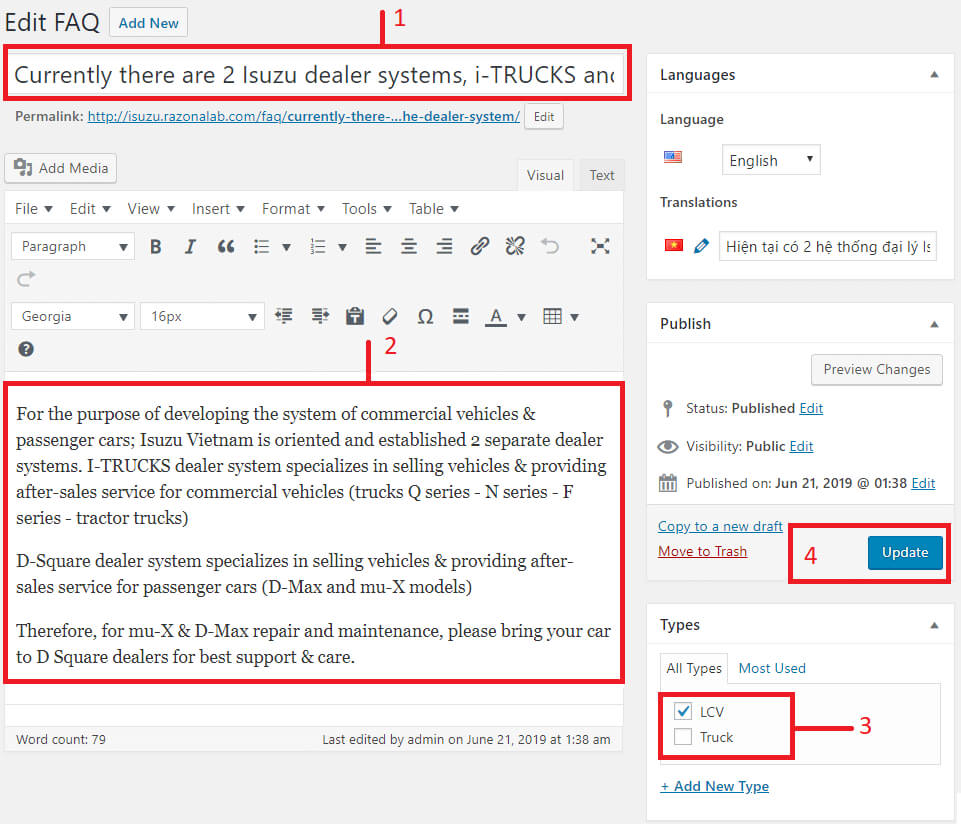
- Step 1- Change title
- Step 2- Change content
- Step 3- Select type of faq
- Step 6- Click Update to save
LCV Management
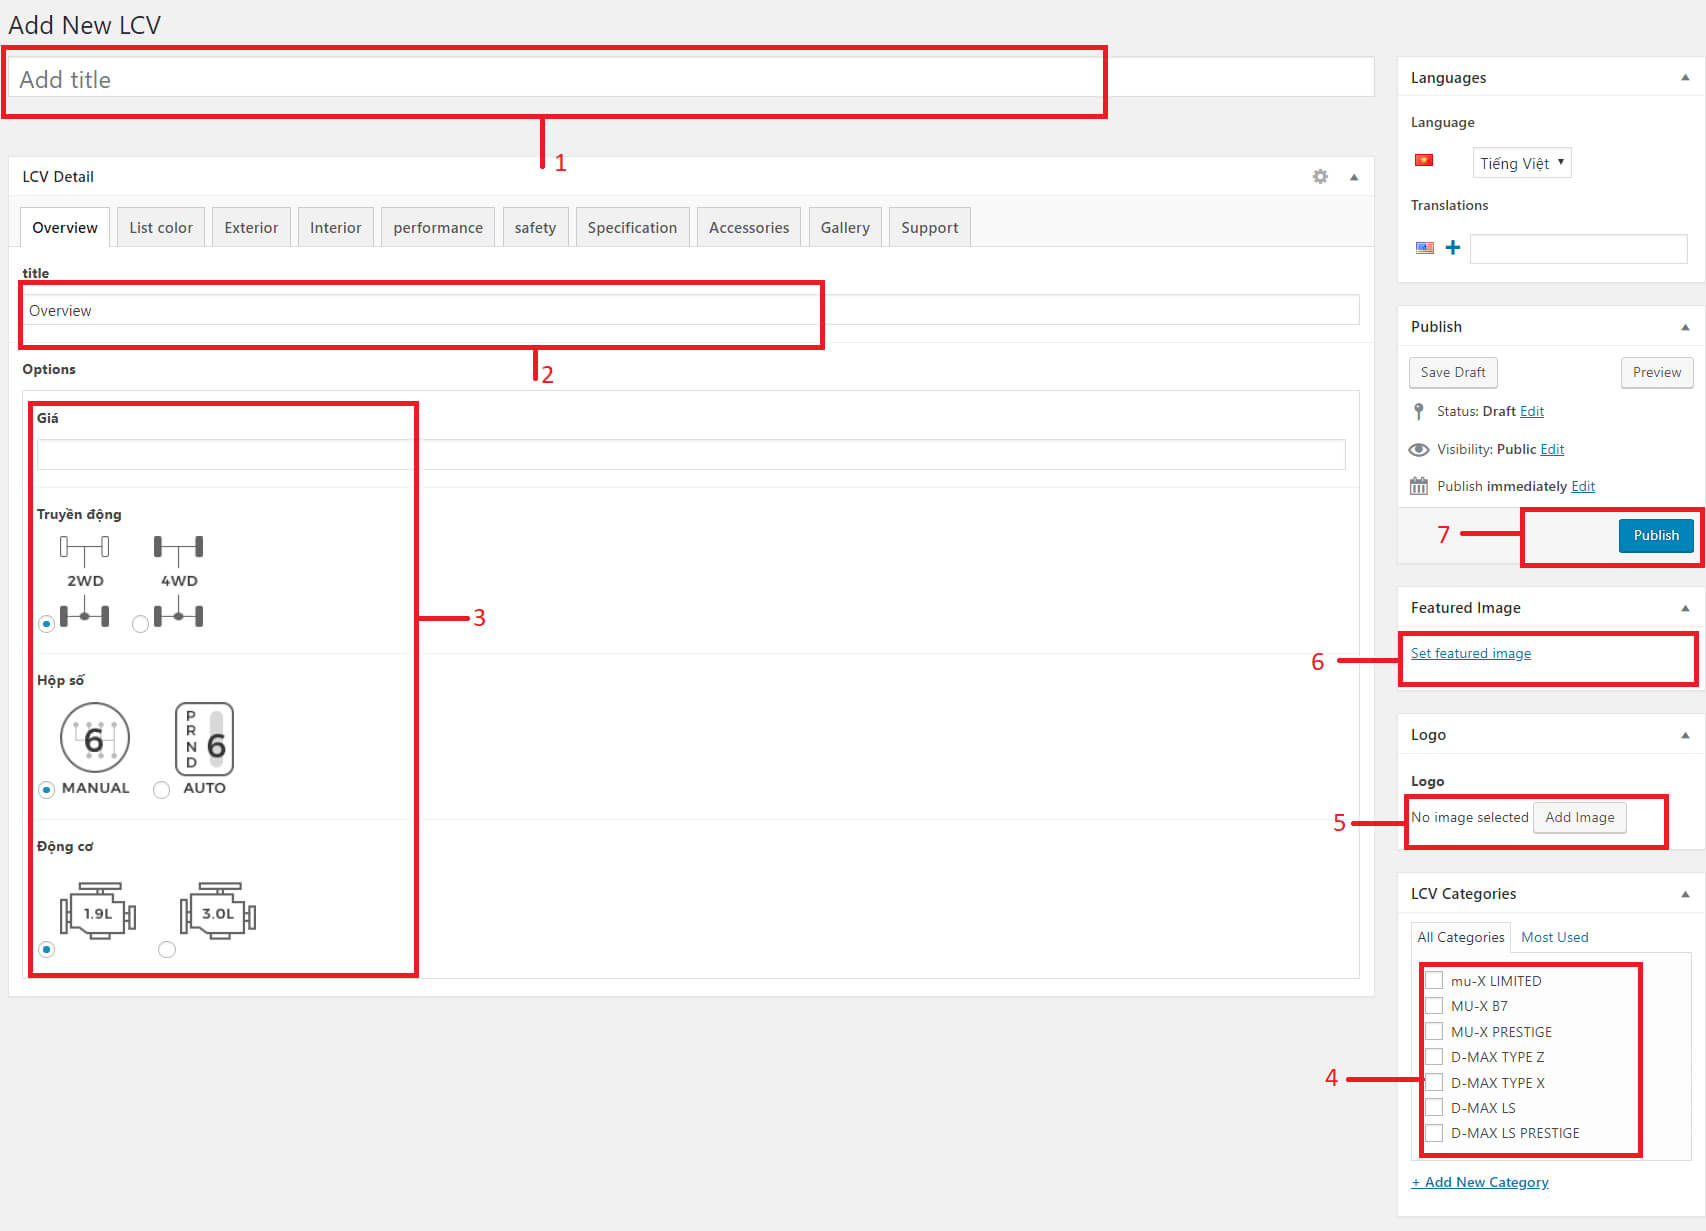
Add New LCV
- Login to Wordpress Dashboard
- Navigate to LCVs and select Add New
- Step 1- Insert name of LCV
- Step 2- Insert title section
- Step 3- Insert and select infomation of LCV
- Step 4- Select category LCV
- Step 5- Select or upload logo
- Step 6- Select or upload thumbnail LCV
- Step 7- Click Publish to save
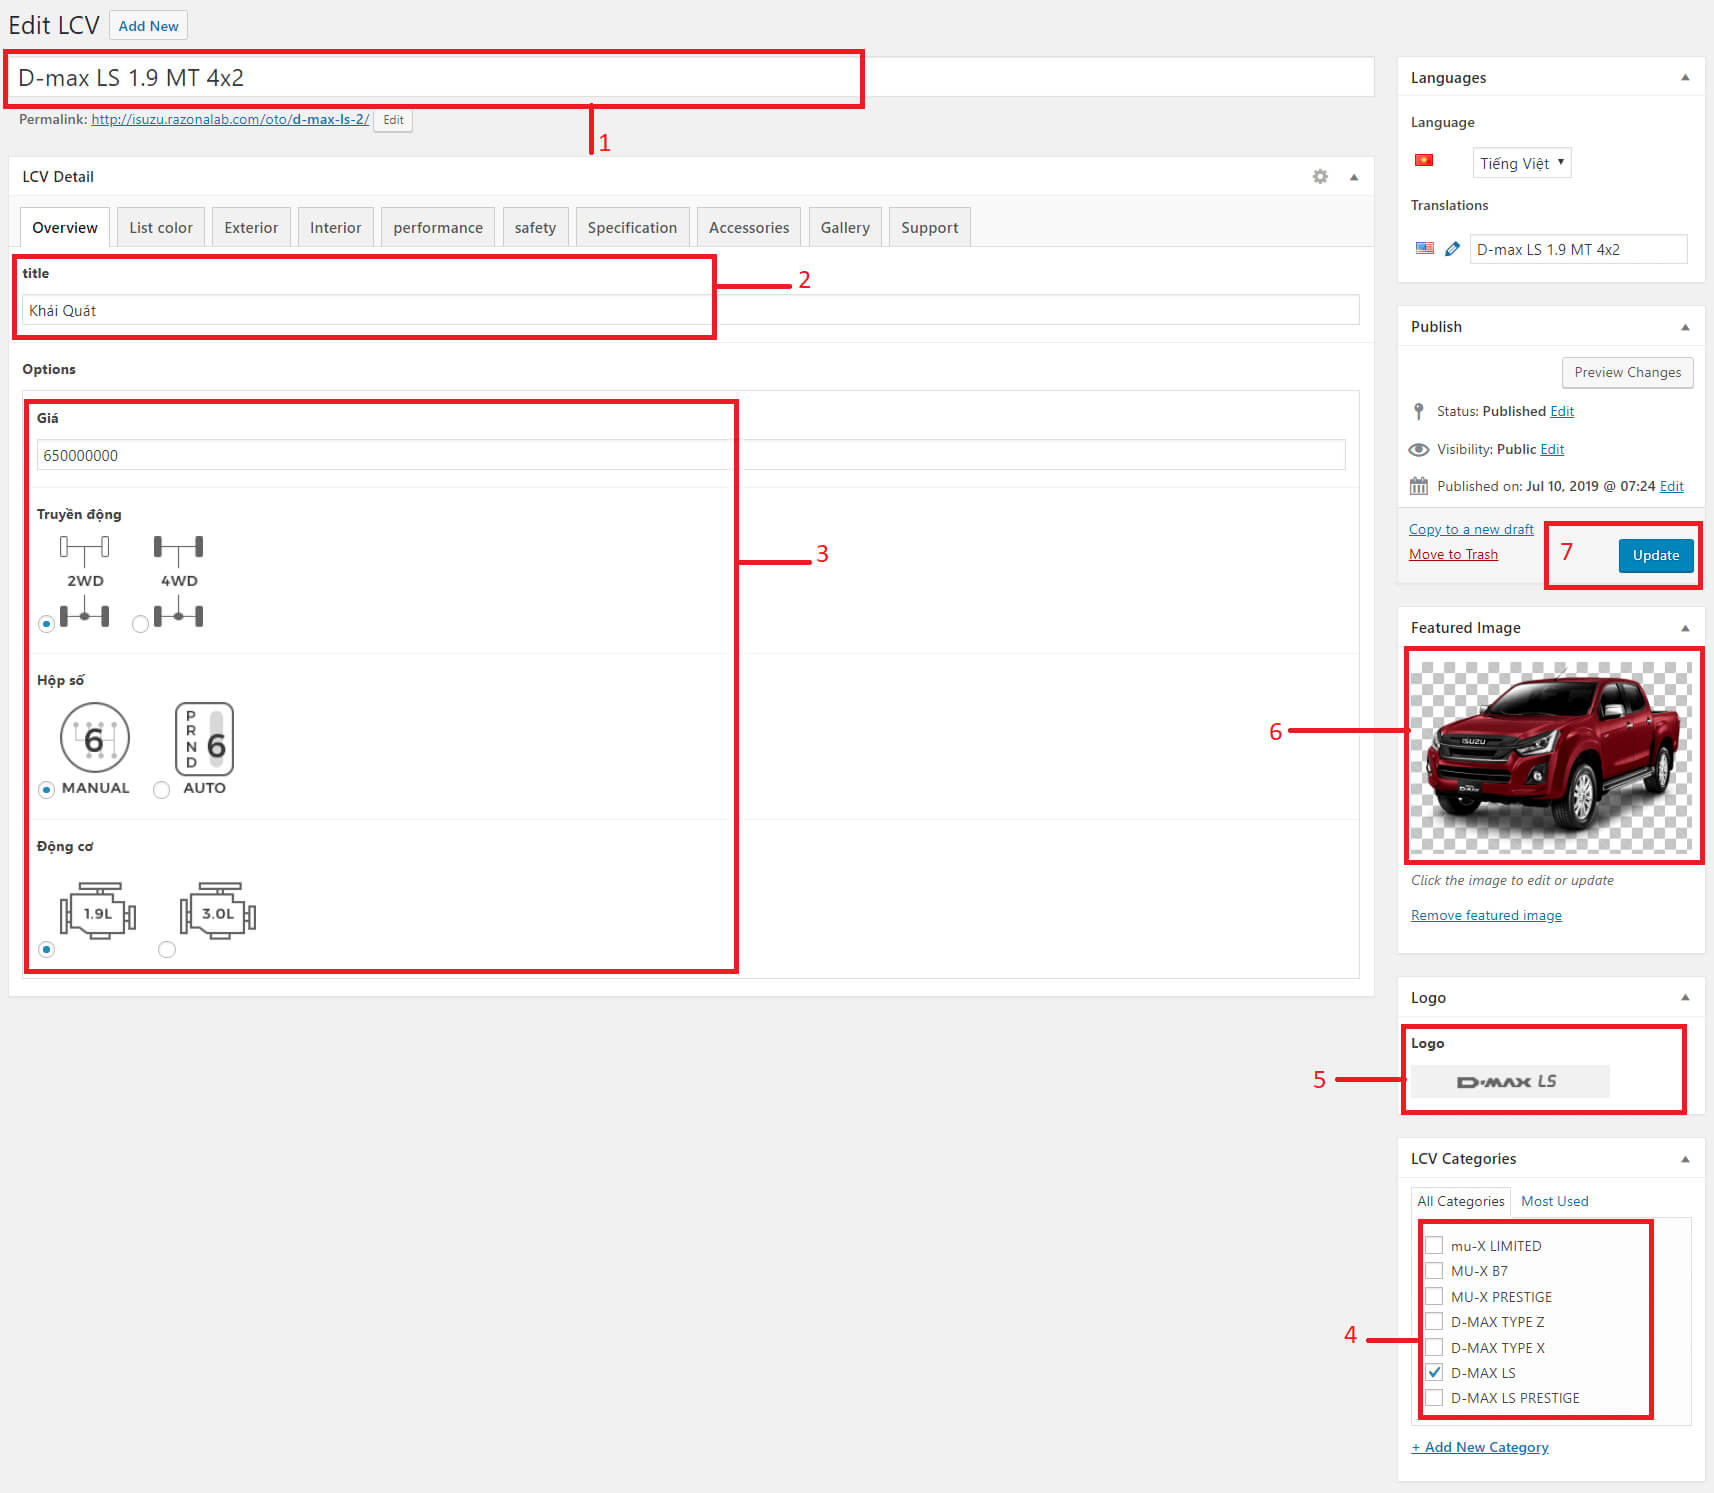
Edit LCV
- Login to Wordpress Dashboard
- Navigate to LCV -> All LCV
- Step 1 - Select a title of LCV
- Step 1- Change name
- Step 2- Change title section
- Step 3- Change infomation of LCV
- Step 4- Select category LCV
- Step 5- Select or upload logo
- Step 6- Select or upload thumbnail LCV
- Step 7- Click Update to save
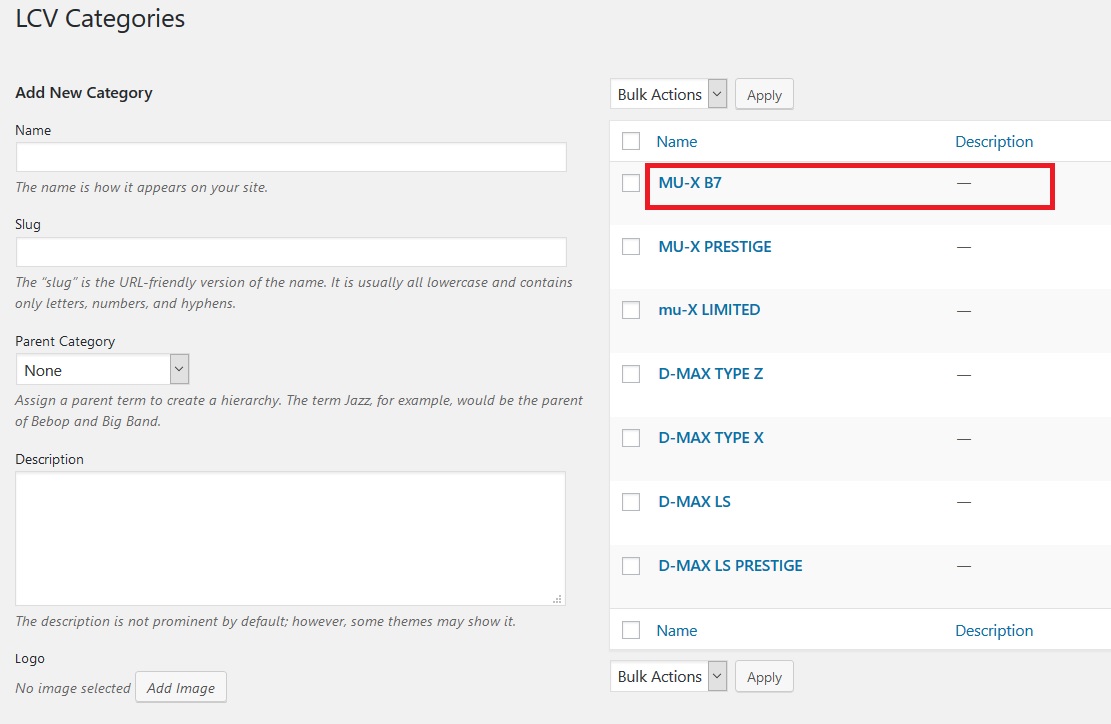
Sort category LCV
- Login to Wordpress Dashboard
- Navigate to LCV -> LCV categories
- Select a category and hold mouse move to new position.
Truck Management
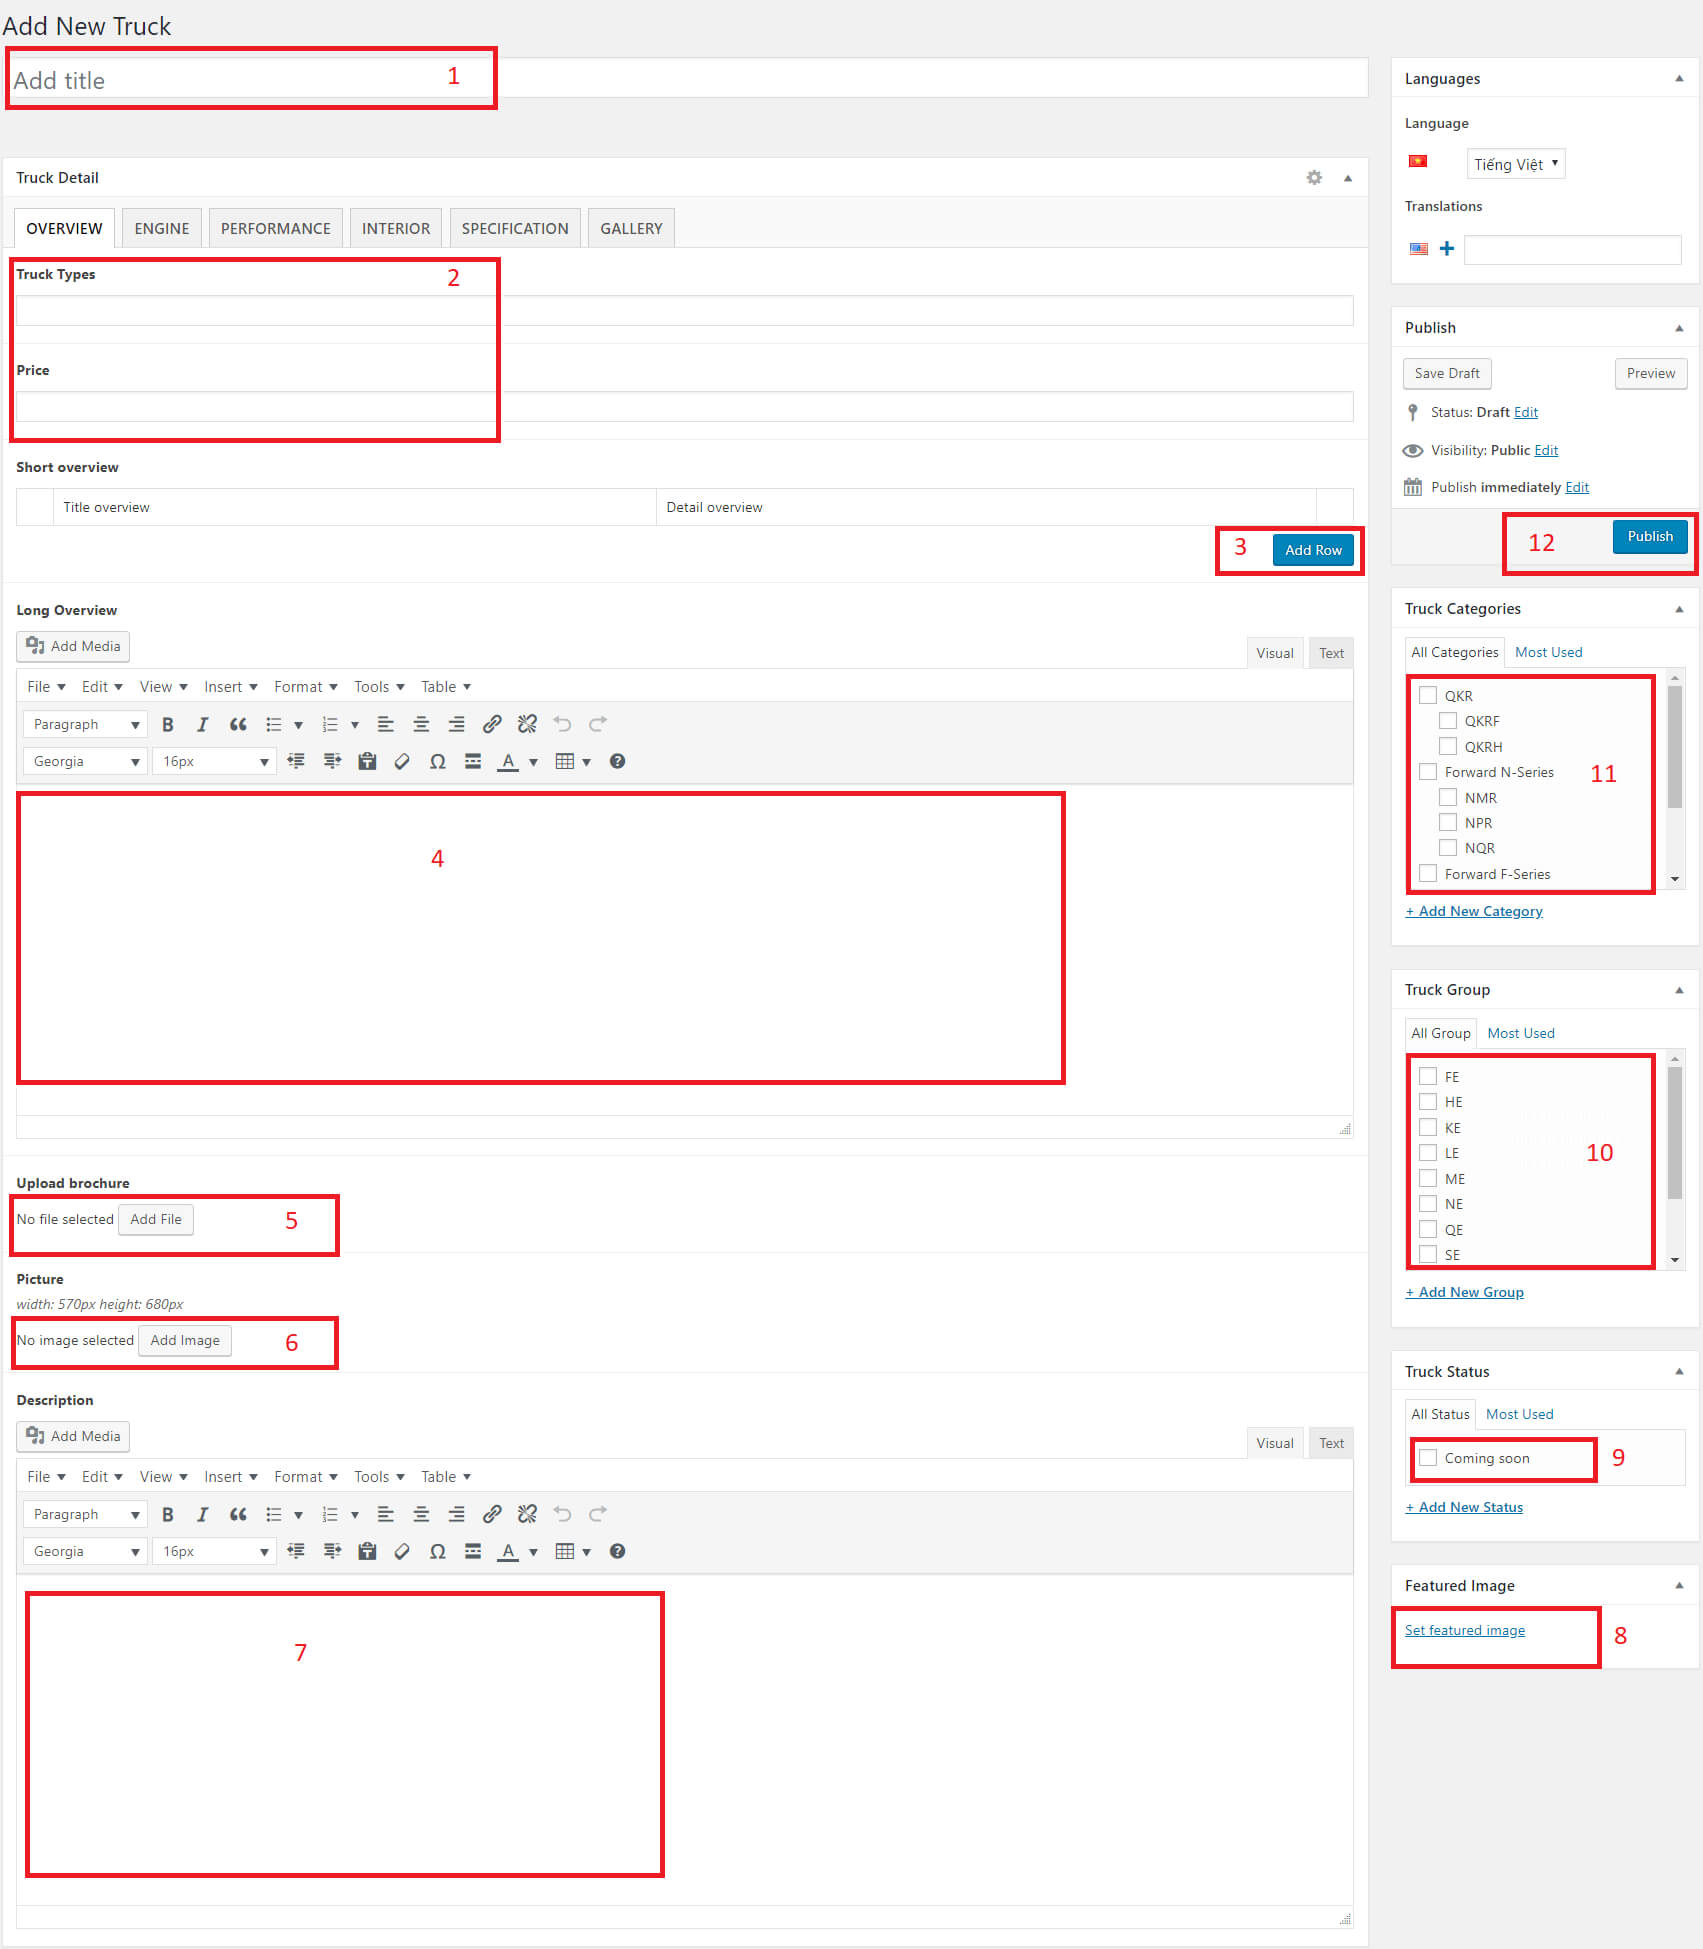
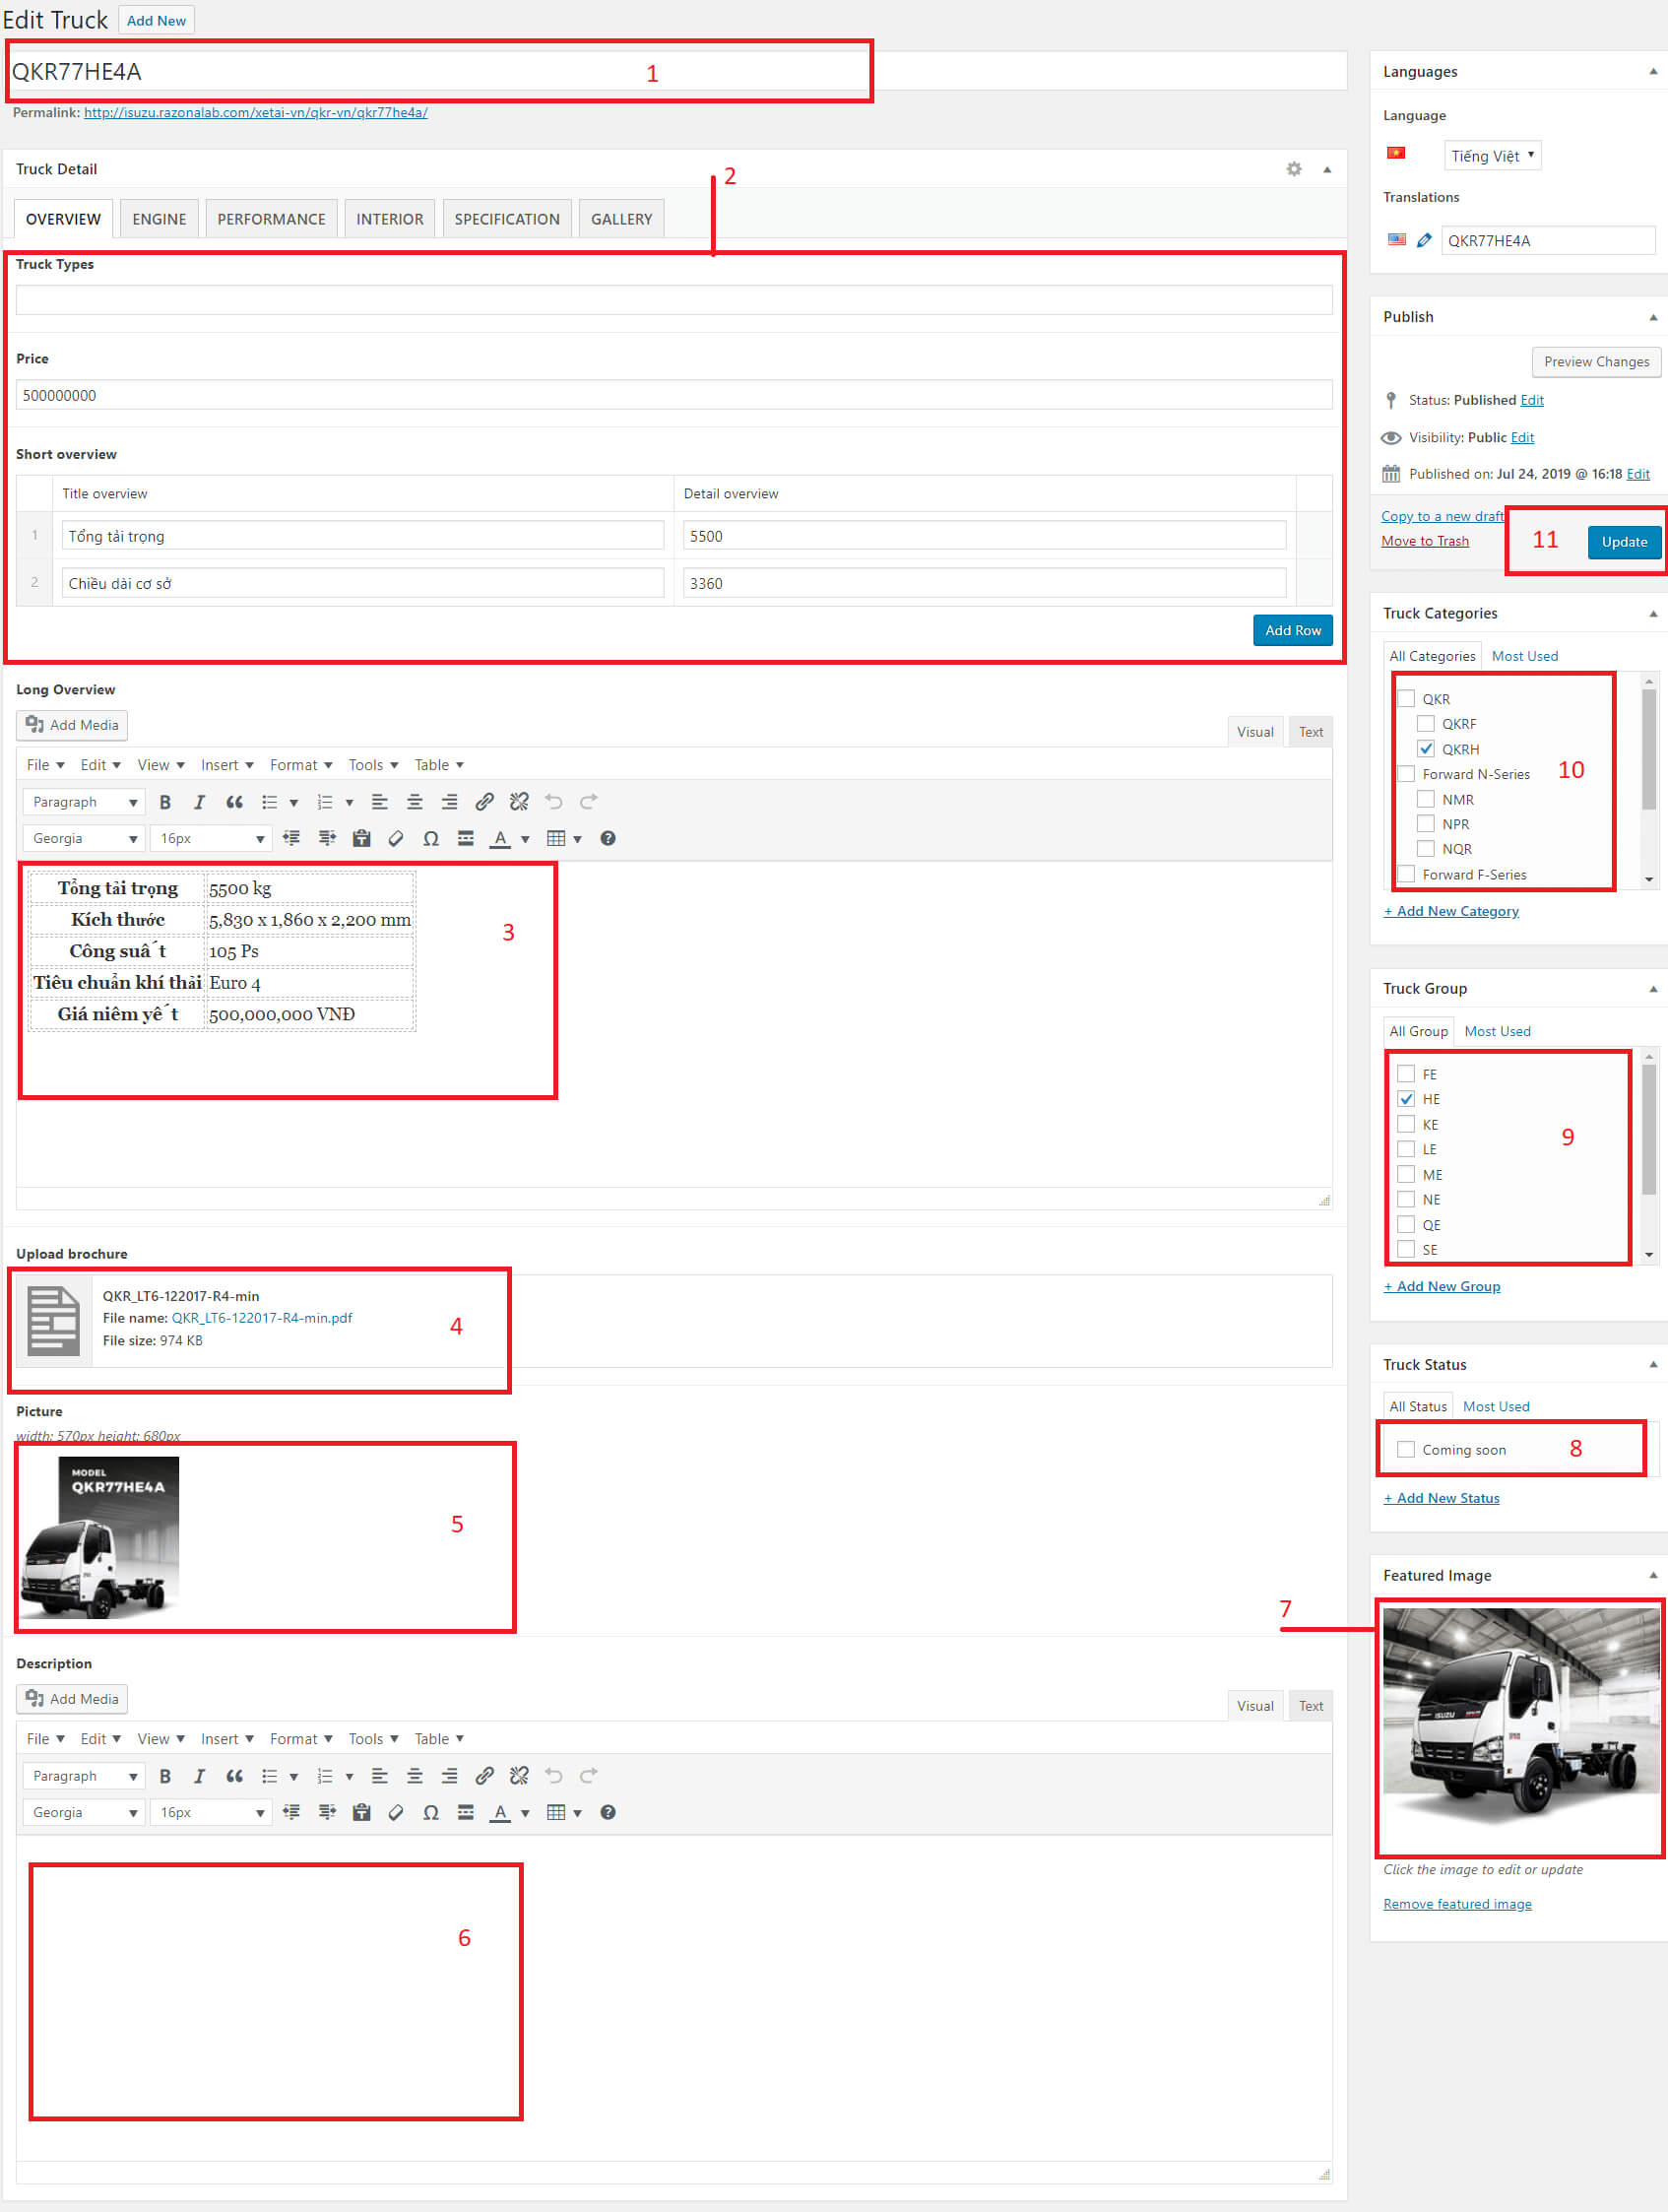
Add New Truck
- Login to Wordpress Dashboard
- Navigate to Trucks and select Add New
- Step 1- Insert name of Truck
- Step 2- Insert truck type: Chassic, Canvas, Van...
- Step 3- Add short infomation of Truck
- Step 4- Insert long infomation of Truck
- Step 5- Upload brochure
- Step 6- Upload Picture
- Step 7- Insert description
- Step 8- Select or upload thumbnail
- Step 9- Check if truck type comming soon
- Step 10- Select truck group
- Step 11- Select category Truck
- Step 12- Click Publish to save
Edit Truck
- Login to Wordpress Dashboard
- Navigate to Truck -> All Truck
- Select a title of Truck
- 1- Change name of Truck
- 2- Change truck type and infomation of Truck
- 3- Change long infomation of Truck
- 4- Upload brochure
- 5- Upload Picture
- 6- Change description
- 7- Select or upload thumbnail
- 8- Check if truck type comming soon
- 9- Select truck group
- 10- Select category Truck
- 11- Click Update to save
SPV Management
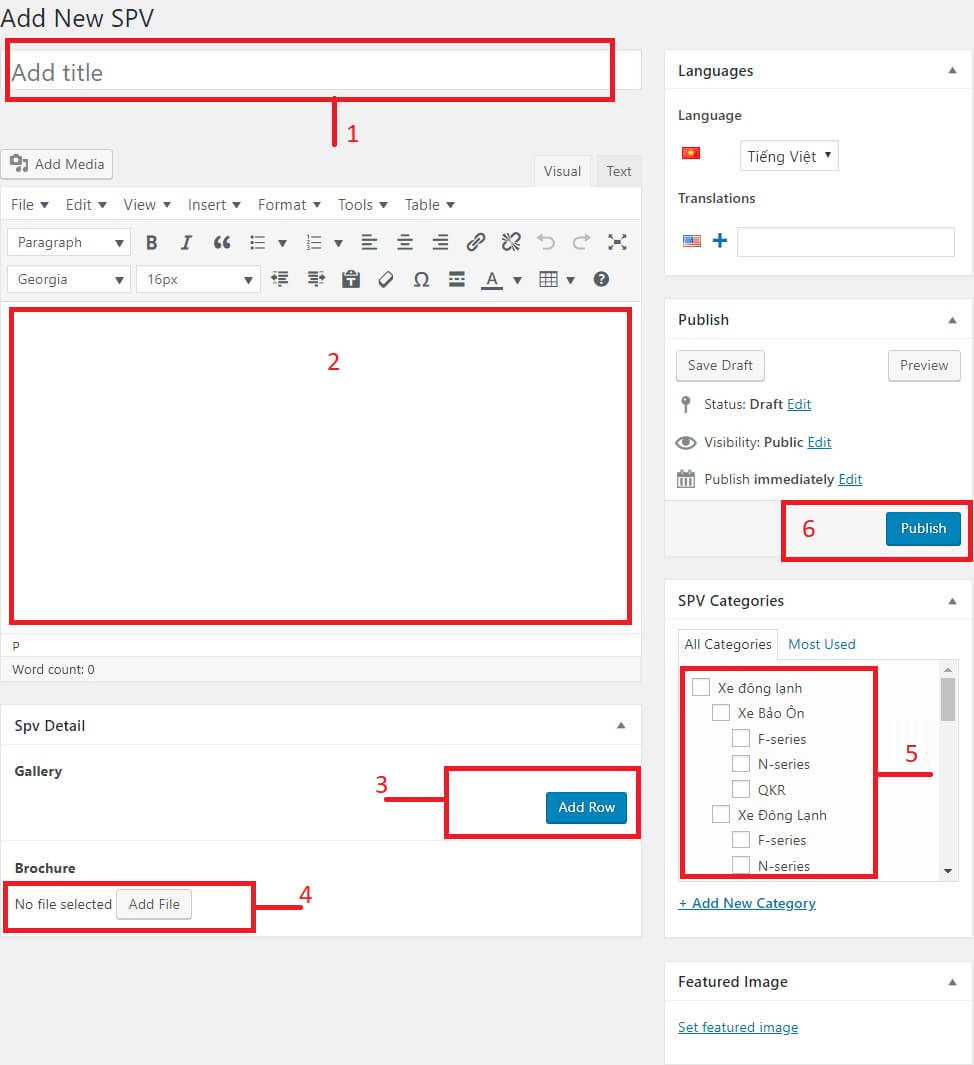
Add New SPV
- Login to Wordpress Dashboard
- Navigate to SPVs and select Add New
- Step 1- Insert name of SPV
- Step 2- Insert content
- Step 3- Add new item gallery
- Step 4- Upload brochure
- Step 5- Select category SPV
- Step 6- Click Publish to save
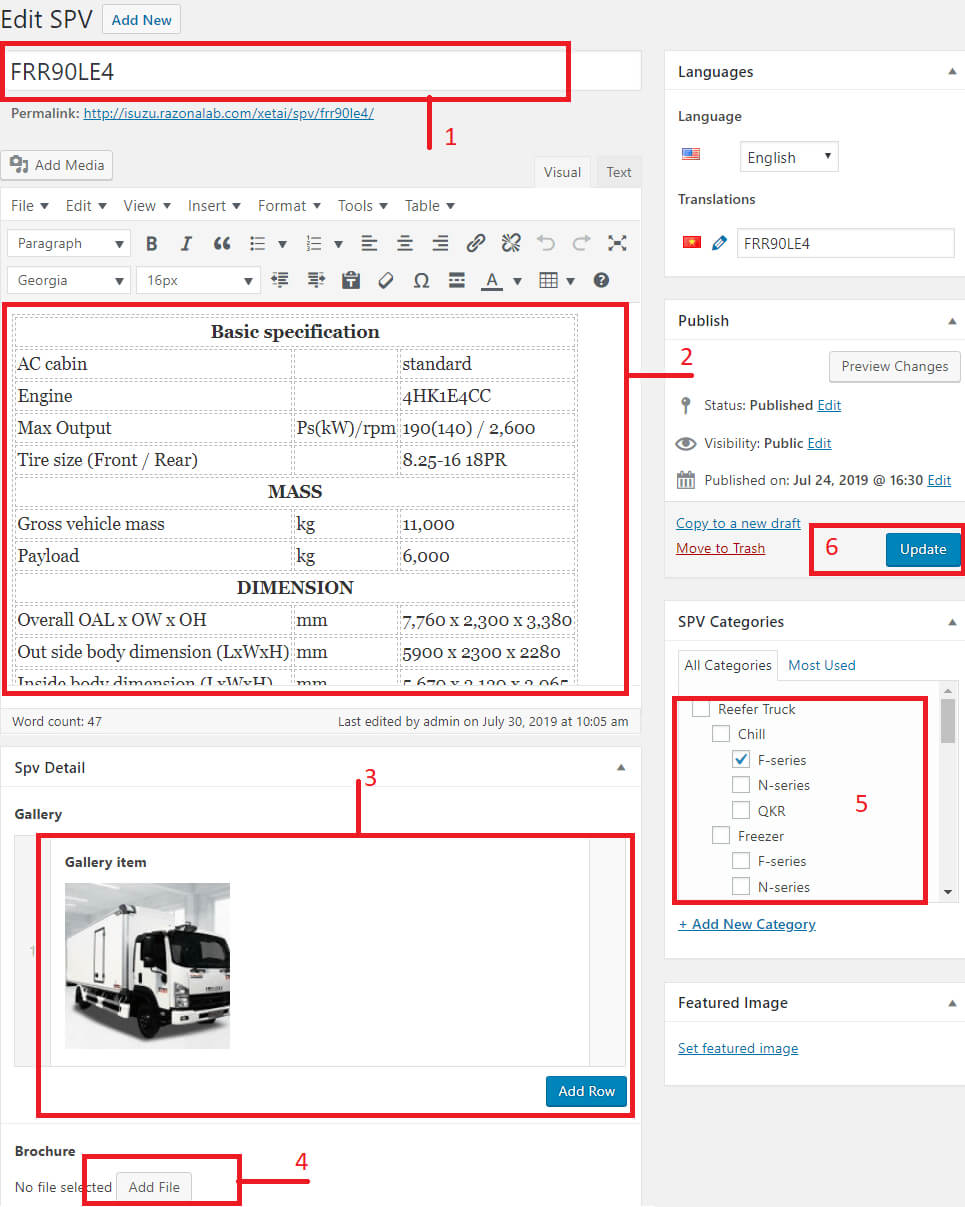
Edit SPV
- Login to Wordpress Dashboard
- Navigate to SPV -> All SPV
- Select a title of SPV
- Step 1- Change name
- Step 2- Change content
- Step 3- Change item gallery
- Step 4- Upload brochure
- Step 5- Select category SPV
- Step 6- Click Update to save
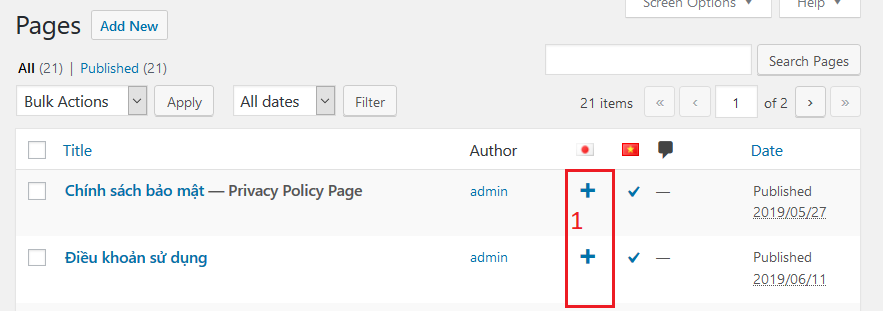
Translate language
- Login to Wordpress Dashboard
- Navigate to Page or Job, News
- Step 1 - Click icon Plus of item you want translate.
- Step 2 - Insert title language
- Step 3 - Insert content language
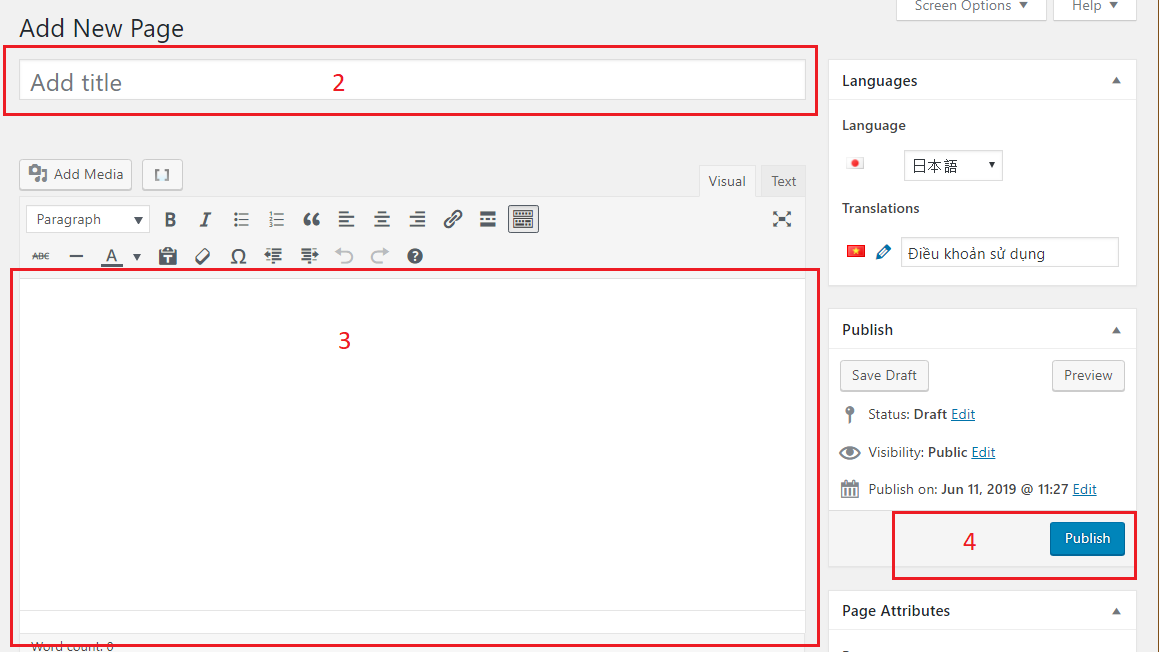
- Step 4 - Click Publish to save your work.
Common Management
Theme Setting
- Login to Wordpress Dashboard
- Navigate to General Settings
- Step 1- Contact Info english
- Step 2- Contact Info vietnamese
- Step 3- Link to Facebook, youtube
- Step 4 - Click Update to save

Menu
- Login to Wordpress Dashboard
- Navigate to Appearance -> Menus
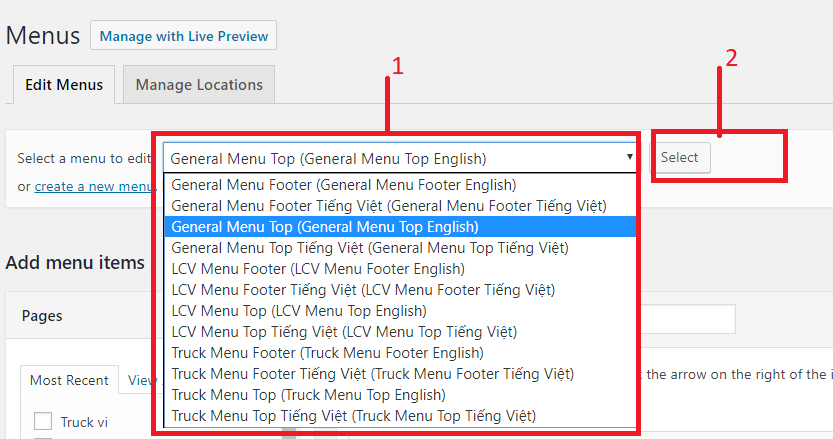
- Step 1 - Click list dropdown Menu to show Menu (en, vi) and select one menu
- Step 2 - Click Select to edit menu
Edit Menu Item
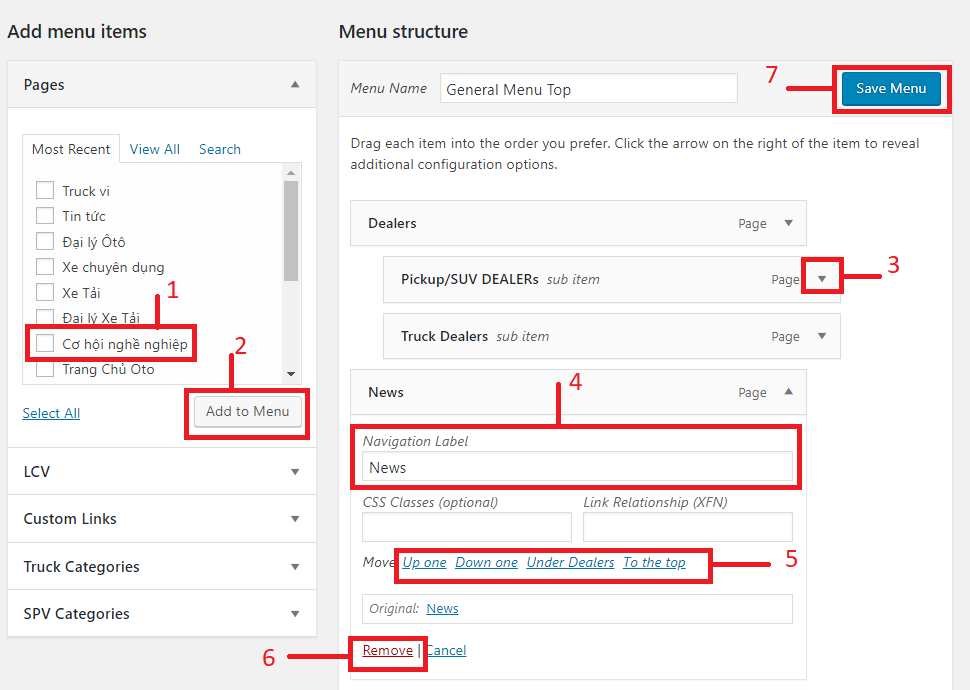
- Step 1- Select one or more item on the list
- Step 2- Click Add to Menu
- Step 3- Click `icon down` to show `menu item` info
- Step 4- You can update name of menu Navigation Label use tag <br> to break line
- Step 5- Sort menu to up, down
- Step 6- If don't like it you can click Remove to delete item menu
- Step 7 - Click Save Menu to update
